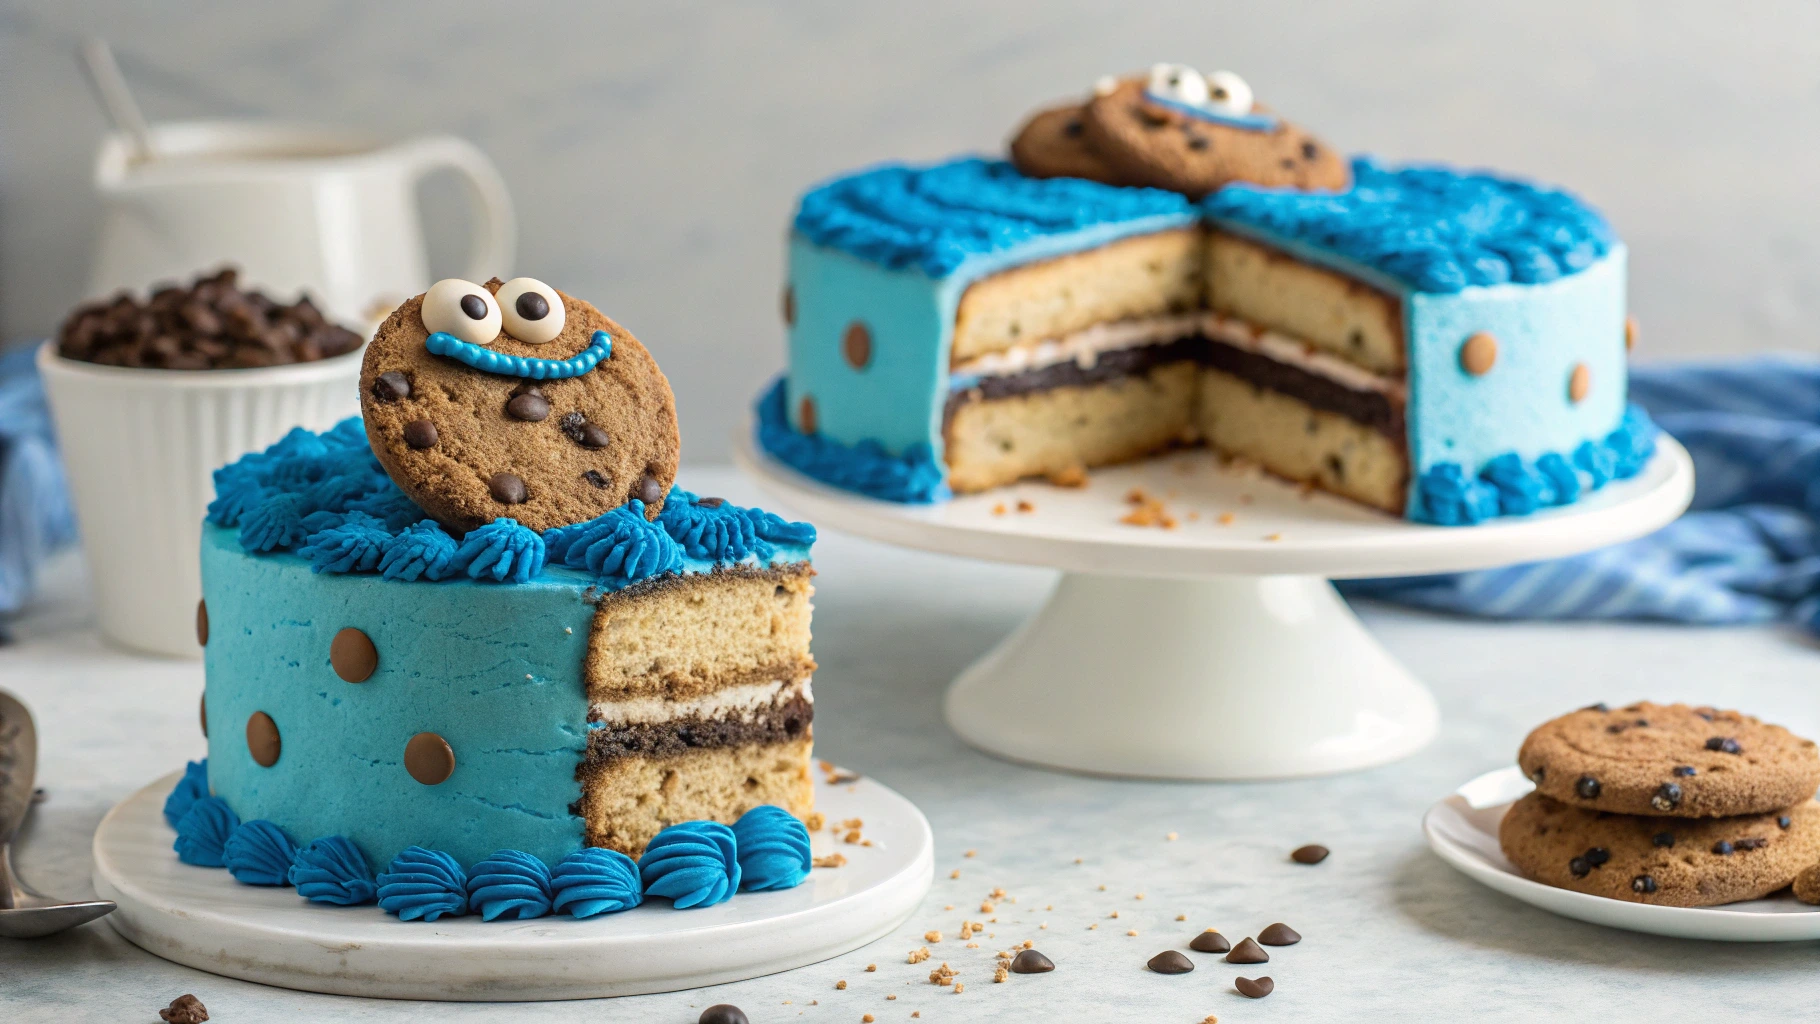
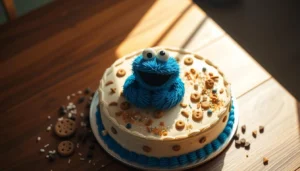
Do you remember those birthday parties with just ordinary cakes? Get ready to make your next celebration unforgettable with a stunning cookie monster cake. It will make every child’s eyes light up with joy!
Making the ultimate character cake is more than just baking. It’s about creating memories. Whether it’s for a boy’s birthday or to surprise a Sesame Street fan, this cake will be the party’s highlight.
Imagine the excitement when your guests see a cake that looks like it came from TV. It’s furry, vibrant, and delicious. This cake is more than a dessert; it’s an experience that will be remembered forever.
Transform Your Party With This Epic Cookie Monster Cake


Making a standout sesame street cake needs careful planning and the right tools. Your DIY cookie monster cake can turn a simple birthday party into a memorable event. Impress your guests with a blue monster cake that looks like it was made by pros!
Essential Tools and Ingredients
Getting ready for your DIY cookie monster cake means collecting the right stuff. Here’s what you’ll need:
- Cake mix or ingredients for homemade cake batter
- Blue food coloring
- Buttercream frosting
- Piping bags and large star tips
- Fondant for decorative elements
- Chocolate cookies
Basic Cake Making Steps
Making the perfect blue monster cake involves a few key steps:
- Bake your cake base using your favorite recipe
- Allow cake to cool completely
- Create a smooth crumb coat with buttercream
- Mix blue food coloring into remaining frosting
- Use star tip to create signature furry texture
Time Management Tips
Your sesame street cake doesn’t have to be stressful. Plan ahead by preparing parts in advance. Bake the cake a day before decorating, and mix frosting colors the night before. This way, you can make a stunning blue monster cake without the stress of last-minute work.
Pro tip: Practice your piping technique on a practice board before decorating the actual cake!
With these tips, you’ll make a DIY cookie monster cake that will bring joy and excitement to any birthday party.
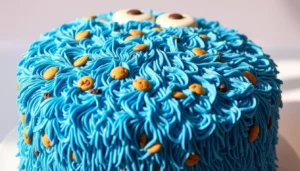
Creating the Perfect Blue Fur Effect for Your Character Cake
Making Cookie Monster’s blue fur is like a work of art. It turns a simple blue icing cake into a masterpiece. With the right techniques, your cake decorating dreams can come true.
When you’re making a fondant Cookie Monster, focus on texture and color. Pick the perfect blue that shows off the character’s lively spirit.
- Choose gel food coloring for intense blue hues
- Mix colors gradually to achieve the ideal Cookie Monster blue
- Test color swatches before applying to your entire cake
For a realistic fur look, try these decorating tips:
- Use a grass piping tip for textured blue icing
- Create short, uneven bursts to mimic furry texture
- Layer colors for depth and dimension
“The secret to an amazing character cake is in the details” – Professional Baker
Pro tip: Chill your cake between icing layers. It keeps the fur texture and stops it from melting.
Cookie Monster Cake Design: Tips and Techniques
Making a stunning Cookie Monster cake needs focus and smart design tricks. Your kids’ cakes can really shine with the right decorating and styling.
Turning a simple cake into a Cookie Monster wonder involves several important design parts. These will make both kids and cake lovers happy.
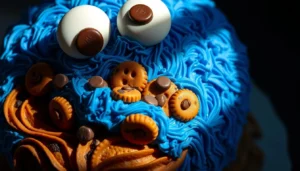
Making the Signature Googly Eyes
The eyes are key to Cookie Monster’s fun personality. For your cake topper ideas, try these eye-making tips:
- Use white fondant or royal icing for the base
- Create black pupils using small chocolate chips
- Slightly tilt the eyes for a whimsical look
- Ensure eyes are proportional to the cake size
Crafting the Perfect Cookie Decorations
No Cookie Monster cake is complete without cookies! Here are some creative ways to add edible cookie elements:
- Bake mini chocolate chip cookies
- Use cookie fragments around the cake base
- Create a cookie “mouth” area
- Add scattered cookie pieces for texture
Achieving the Right Shade of Blue
The iconic blue fur is what makes a Cookie Monster cake instantly recognizable. Pro tip: Mix blue food coloring gradually to get the perfect Cookie Monster blue – not too dark, not too light.
Select gel food coloring for more vibrant, consistent color. Start with a small amount and build up to achieve that characteristic fuzzy blue look. This will make your homemade Cookie Monster cake truly spectacular.
Simple Decorating Hacks for a Professional-Looking Sesame Street Cake
Making a stunning Cookie Monster birthday cake is easy. You don’t need to be a pro. Just use some smart decorating tricks to turn a simple cake into a party highlight.
Learn these simple steps to make your cake look like it came from a bakery:
- Use a piping bag with a grass tip to create Cookie Monster’s signature fuzzy blue texture
- Create clean frosting edges by using a bench scraper or offset spatula
- Mix different shades of blue buttercream for a more realistic, dimensional look
The key to a great cookie monster birthday party cake is in the details. Precision and patience are crucial when working with frosting. Chill your cake between frosting layers to get a smooth finish and avoid crumbs.
Pro tip: Use a turntable for even frosting and professional rotation while decorating!
To make Cookie Monster’s eyes, use large round fondant or buttercream circles with small black pupils. This simple trick makes your cake look amazing.
- Practice piping techniques on parchment paper first
- Keep your frosting at the right temperature for best results
- Use stencils or templates for consistent decorations
Remember, cake decorating is an art that gets better with practice. Don’t be afraid to try new things and have fun with your design!
If you love fun character-themed desserts, don’t miss this Tasty Bluey Cake that’s perfect for kids’ celebrations!
Creative Ways to Customize Your Cookie Monster Birthday Party Theme
Planning a Cookie Monster birthday party needs creativity and detail. Your party can go from ordinary to amazing with the right theming and fun touches. These bring the Sesame Street character to life.
Creating a memorable Cookie Monster birthday party is more than just the cake. You want to make an experience that delights everyone, no matter their age.
👉 Matching Cupcakes and Treats
Cookie Monster cupcakes are essential for your themed party. Here are some great ideas:
- Blue buttercream frosted cupcakes with googly candy eyes
- Mini chocolate chip cookie decorations
- Edible monster fur made from shredded coconut
👉 Party Decoration Ideas
Make your space pop with these decoration tips:
- Blue and white color scheme
- Cookie-themed banners
- Sesame Street character cutouts
- Cookie-shaped balloons
👉 Photo-Worthy Presentation Tips
Make your party look great with smart cake toppers and staging. Choose toppers that show Cookie Monster’s fun side. Place your cake as the main attraction, using soft light to highlight its details.
A well-planned Cookie Monster birthday party is an experience guests will remember. They’ll talk about it long after the last cookie crumb is gone.
Troubleshooting Common Issues When Making Character Cakes
Making a perfect character cake can be tough, even for pros. When you’re making a DIY Cookie Monster cake, you might hit some decorating hurdles. Knowing how to solve these problems will help you make a cake that looks amazing.
Working with blue frosting can be tricky. Getting Cookie Monster’s blue right takes patience and skill. Start with white buttercream and add gel food coloring bit by bit. Mix well to avoid streaks or uneven color.
- Color mixing challenges: Use gel food coloring for more vibrant results
- Frosting consistency problems: Keep buttercream at room temperature
- Structural issues: Refrigerate cake layers before decorating
Getting the fur texture right is key for your Cookie Monster cake. Use a grass piping tip for realistic fur. Practice on a practice board before decorating the cake. This builds your confidence and skill.
Structural issues are a big worry with 3D cakes. Use dowels or cake boards for support to prevent collapse. Chill the cake between decorating steps to keep its shape and prevent frosting from getting too soft.
Pro tip: Always have extra frosting and decorating tools on hand to quickly fix any unexpected design challenges!
With these tips, you’ll be able to make a stunning Cookie Monster cake. It will surely impress everyone at the party.
Conclusion
Making a Cookie Monster cake turns a simple birthday into a special day. It shows how baking can be magical for kids. With creativity and the right skills, you can make a cake that brings happiness and lasting memories.
Creating a cookie monster cake is more than baking. It’s about making a moment that brings joy to kids. Every step, from mixing to adding blue frosting fur, is a chance to bond with your child.
Whether you’re new to baking or have some experience, this project is a chance to grow. You’ll learn skills that can be used for other character cakes. Your effort to make a unique cake will make your child’s day unforgettable.
It’s not about being perfect – it’s about having fun and showing love. Trying something new and making a special cake is what counts. Enjoy the journey, celebrate your creativity, and the joy your cake will bring.
FAQ
How difficult is it to make a Cookie Monster cake?
Making a Cookie Monster cake is a bit challenging but doable for those with some baking experience. You’ll need the right tools and a bit of patience. Breaking down the steps and practicing your decorating skills will help you create a stunning cake.
What special tools do I need to make a Cookie Monster cake?
To make a cake that looks like it was made by a pro, you’ll need specific tools. You’ll need piping bags, different piping tips, an offset spatula, and blue food coloring. Fondant tools and google eyes are also essential. A turntable makes frosting easier.
How can I get the perfect blue color for the Cookie Monster cake?
Getting the right blue color is key for a Cookie Monster cake. Start with white buttercream or fondant and add blue food coloring slowly. Use gel coloring for a brighter blue. Mix until you get the perfect Cookie Monster blue.
Can I make a Cookie Monster cake in advance?
Yes, you can prep parts of the cake ahead of time. Bake and freeze the cake layers up to a week before. Frosting can be made 2-3 days early. But, do the final decorating in 1-2 days for the best look.
What are some alternatives if I’m not confident in my cake decorating skills?
If decorating is too daunting, there are simpler options. Use a cake topper or a blue buttercream with store-bought decorations. You can also make Cookie Monster cupcakes. Many bakeries offer custom cakes if you want a pro to do it.
How do I make Cookie Monster’s signature googly eyes?
You can make Cookie Monster’s eyes with fondant, royal icing, or buy them. For homemade eyes, roll white fondant into circles, add black pupils, and attach with frosting.
How can I make the cake more interactive for a birthday party?
Make the cake interactive by adding edible cookies. You can create a scene of Cookie Monster eating cookies. Cookie decorations and themed party items will also add to the fun.
What are some common mistakes to avoid when making a Cookie Monster cake?
Avoid using too much food coloring and not cooling cake layers before frosting. Rushing the decorating is also a mistake. Take your time, use a crumb coat, and practice piping before decorating the cake.

Cookie Monster Cake Ingredients
A fun and whimsical cake that’s perfect for birthdays or any Sesame Street-themed celebration.
This Cookie Monster cake is easy to make, even for beginners, and brings a big smile to kids and adults alike.
With fluffy blue frosting, googly eyes, and a cookie-filled mouth, it’s as adorable as it is delicious!
- Total Time: 1 hr 10 mins
- Yield: 12 slices 1x
Ingredients
For the Cake Layers:
- 2 ½ cups all-purpose flour
- 2 ½ tsp baking powder
- ½ tsp baking soda
- ½ tsp salt
- ¾ cup unsalted butter, room temperature
- 1 ¾ cups granulated sugar
- 4 large eggs
- 1 cup whole milk (or unsweetened almond milk)
- 2 tsp pure vanilla extract
For the Frosting:
- 1 cup unsalted butter, room temperature
- 3 ½ cups powdered sugar
- 2 tbsp whole milk
- 1 ½ tsp vanilla extract
- Blue gel food coloring
For Decoration:
- Large white candy melts or fondant (for eyes)
- Black edible marker or melted chocolate (for pupils)
- Mini chocolate chip cookies or any crunchy cookie
- Piping tip #233 (grass tip) for the “furry” effect
Instructions
-
Preheat oven to 350°F (175°C). Grease and flour two 8-inch round cake pans. Line the bottoms with parchment paper.
-
Make the cake batter: In a medium bowl, whisk flour, baking powder, baking soda, and salt. In a large bowl, cream butter and sugar until light and fluffy. Add eggs one at a time, beating well. Mix in vanilla.
-
Alternate adding dry ingredients and milk to the butter mixture, starting and ending with flour. Mix just until combined.
-
Divide the batter evenly between pans and bake for 25–30 minutes, or until a toothpick comes out clean. Cool in pans for 10 minutes, then turn out onto a wire rack to cool completely.
-
Prepare the frosting: Beat butter until creamy. Gradually add powdered sugar, then milk and vanilla. Tint the frosting with blue gel food coloring until you achieve Cookie Monster’s signature shade.
-
Assemble the cake: Level the cakes if needed. Place one layer on a cake board, spread a layer of frosting, then stack the second cake on top.
-
Frost the cake: Use the blue frosting with piping tip #233 to create a textured, furry look all over the cake.
-
Make the eyes: Use white candy melts or fondant balls and dot them with melted chocolate or an edible marker for pupils. Place on top of the cake at a slight angle.
-
Add cookies by cutting a small slit in the frosting and pushing mini cookies into Cookie Monster’s “mouth.” Scatter a few broken cookie bits for a fun touch.
- Prep Time: 25 mins
- Cook Time: 30 mins
- Category: Dessert
- Method: Baking
- Cuisine: American
- Diet: Vegetarian
Keywords: Cookie Monster Cake


