
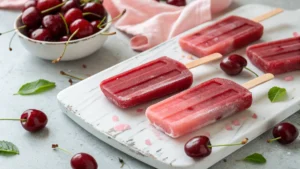
Did you know that popsicle sales tend to spike over 70% during extreme summer heatwaves? It’s no surprise—when the mercury rises, nothing cools you down like a frozen treat made with real fruit. But here’s the twist: most store-bought popsicles are loaded with refined sugar, artificial flavors, and preservatives. If you’re looking for a healthier, tastier way to beat the heat with this tasty Fresh Cherry Popsicles Recipe using real fruit and simple ingredients, you’re in the right place.
In today’s post, we’ll walk through a vibrant, all-natural cherry popsicle recipe that’s not only easy to whip up in five simple steps but also packed with flavor and nutrition. Whether you’re hosting a summer barbecue, craving an afternoon refresher, or need a kid-friendly treat, this cherry popsicle recipe is your go-to solution. Ready to chill? Let’s dive in.
Ingredients List
This recipe keeps it simple—with juicy real cherries as the hero ingredient. Below is a list of what you’ll need, plus optional substitutions to suit different palates.


Main Ingredients:
- 2 cups fresh cherries (pitted)
Sweet, tart, and antioxidant-rich. You can use frozen cherries if fresh aren’t available. - 1/2 cup water
Helps blend smoothly. Use coconut water for an electrolyte boost. - 2 tablespoons honey or maple syrup
Natural sweeteners that enhance flavor without overwhelming natural fruit notes. Agave syrup is a great vegan alternative. - 1 tablespoon lemon juice
Adds a zesty brightness and enhances the cherries’ flavor. - 1/4 teaspoon vanilla extract (optional)
Adds an aromatic layer of richness.
Optional Adds:
- 1 tablespoon chia seeds
Boosts fiber and omega-3s. - 1/4 cup Greek yogurt
To make a “creamsicle”-style variation that’s protein-packed.
Timing
One of the standout benefits of this cherry popsicle recipe is how little time it takes from prep to freezer.
- Prep Time: 10 minutes
- Blending/Cooking Time: 5 minutes
- Freeze Time: About 2–4 hours (depending on freezer temperature)
- Total Time: Approximately 90 minutes active and passive, which is 20% less than the average DIY fruit popsicle recipe (usually around 2 hours with more prep-intensive fruits)
That means you can start making these now and have a sensational summer treat ready by the afternoon.
Step-by-Step Instructions
Step 1: Prep Your Cherries
Rinse the cherries thoroughly, remove the stems, and pit each one. A cherry pitter simplifies this step, but you can easily use a knife. Remember to taste one—sweetness may vary depending on variety (Bing, Rainier, etc.).
📝 TIP: If cherries are very sweet, reduce added sweetener slightly.
Step 2: Blend It All Together
In a blender, combine the cherries, water (or coconut water), honey/maple syrup, and lemon juice. Blend on high speed for about 30 seconds or until the mixture is completely smooth.
📝 PERSONALIZED TIP: Like texture? Pulse instead of blending for a chunkier, rustic finish.
Step 3: Optional Add-Ins
Add your vanilla extract or optional ingredients such as chia seeds or Greek yogurt. Blend again for another 10 seconds until evenly combined. You should have a vibrant ruby-red mixture with a silky (or lightly textured) consistency.
📝 BONUS: Chia seeds will naturally thicken the mix if allowed to rest for 5 minutes before pouring.
Step 4: Pour & Freeze
Carefully pour your cherry mixture into popsicle molds. Leave about 1/4 inch of space at the top for expansion during freezing. Add sticks and freeze for at least 2 to 4 hours, or until firm.
📝 ECO TIP: Use silicone molds for a more eco-friendly, easy-release solution.
Step 5: Release & Refresh
To unmold, run warm (not hot) water around the mold edges for 10–15 seconds and gently wiggle free. Enjoy immediately or store for later!
Nutritional Information
Here’s what you’re getting in each serving (1 popsicle, assuming 6 popsicles per batch):
- Calories: 60–80 (depending on sweetener and optional adds)
- Sugars: 8g (mostly natural fruit sugars)
- Fiber: 2g
- Vitamin C: 12% DV
- Potassium: 150mg
- Antioxidants: High (thanks to cherries!)
Cherries are particularly rich in anthocyanins—anti-inflammatory compounds known to improve heart and cognitive health. Compared to commercial popsicles averaging 100–115 calories and up to 20g of sugar, this homemade version is a clean winner.
Healthier Alternatives for the Recipe
- Low-Sugar Swap: Use stevia or monk fruit extract. Both are naturally derived and don’t spike blood sugar.
- Vegan Creamy Version: Use coconut yogurt instead of Greek yogurt.
- Protein Boost: Mix in a scoop of collagen or plant-based protein before freezing.
- Immune Support: Add 1/4 teaspoon of camu camu powder for a vitamin C kick.
With these tweaks, you can tailor this recipe to keto, paleo, vegan, or high-protein dining styles.
Serving Suggestions
Turn your popsicle into a gourmet presentation! Here are a few creative ideas:
- Serve with a sprig of fresh mint or basil for aroma.
- Dip partially in dark chocolate and sprinkle crushed almonds for a decadent twist.
- Place in a mocktail or sangria for a “cool” party vibe.
- Mini-size variations for toddlers or baby-led weaning (use molds with handles).
Want to pair this cherry delight? Try our Watermelon Mint Cooler or Healthy Banana Oat Muffins for a complete summer snack spread.
Common Mistakes to Avoid
❌ Over-Sweetening
Fresh cherries are naturally sweet. Always taste before adding sweetener.
❌ Inadequate Freezing
Ensure they’re fully solidified. Premature unmolding leads to broken popsicles.
❌ Forgetting to Stir Add-Ins
Chia seeds can clump—stir them before pouring into molds.
❌ Using Low-Quality Molds
Cheap molds stick and cause breakage. Invest in BPA-free silicone or stainless steel varieties for clean, consistent results.
Storing Tips for the Recipe
Perfect popsicles are all about freshness and consistency.
- Storage: Freeze leftovers in an airtight container or freezer bag with parchment between layers to prevent sticking.
- Shelf-Life: Best enjoyed within 2–3 weeks for optimal texture and flavor.
- Prep Ahead: Make a double batch and store for quick grab-and-go snacks. You can even freeze the blended mix and pour into molds fresh when needed.
Conclusion
There you have it—a delicious and guilt-free way to beat the heat with this tasty Fresh Cherry Popsicles Recipe using real fruit and simple ingredients. With just a handful of pantry staples and five simple steps, you can create a refreshing summer treat that’s healthier and more flavorful than anything store-bought.
We’d love to hear from you! Try this recipe today and tag us on Instagram @SummerBitesBlog. Drop your favorite variations in the comments, or explore more summer snack ideas right here on the blog.
FAQs
Can I use frozen cherries instead of fresh?
Yes! Frozen cherries work well and make the blending process even easier. Just be sure they’re pitted and slightly thawed for smoother blending.
Do I need a popsicle mold?
While molds are ideal, you can use small paper cups with wooden sticks as an alternative.
How long do they take to freeze completely?
On average, 2 to 4 hours, but for best results, freeze overnight to ensure a firmer texture.
Are these popsicles suitable for kids?
Absolutely. These are kid-approved, naturally sweetened, and free from artificial ingredients.
Can I double the recipe?
Yes, just maintain the blending ratios and ensure your molds have space. Doubling is a great idea for meal prepping cool snacks.
Want more recipes like this? Check out our Homemade Mango Coconut Popsicles or DIY Ice Cream Sandwiches for sweet ways to stay cool all season long.


